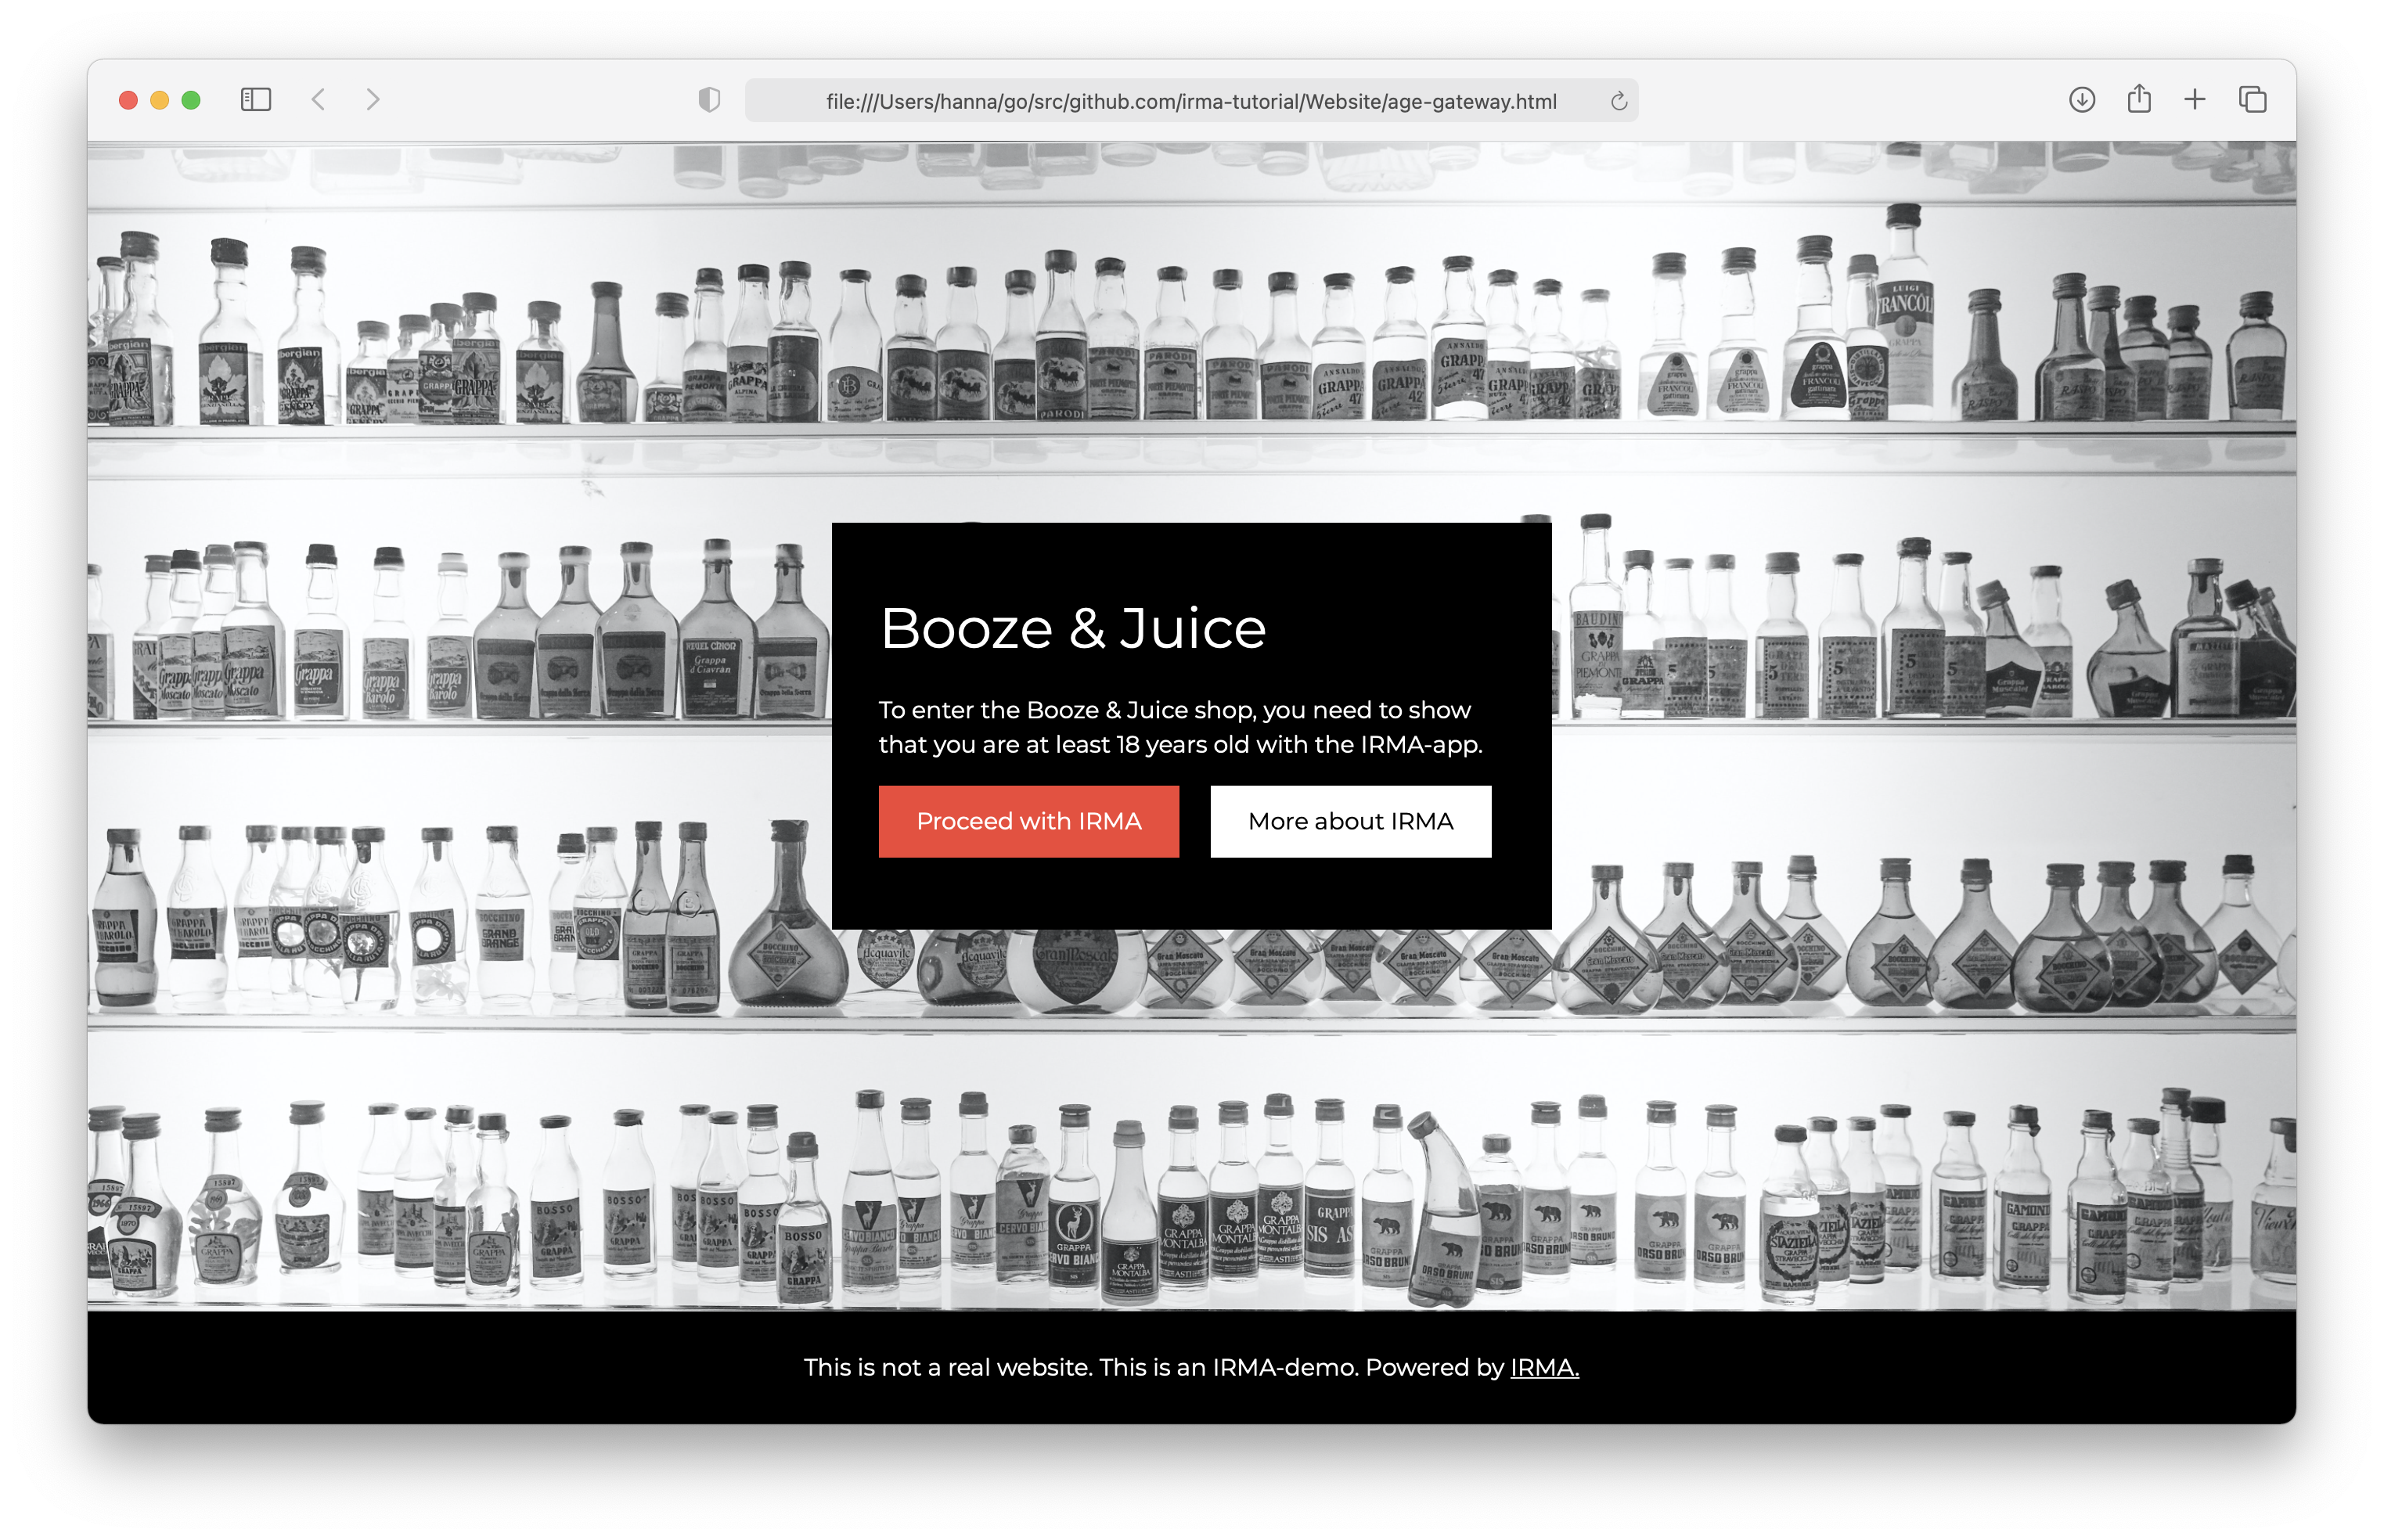
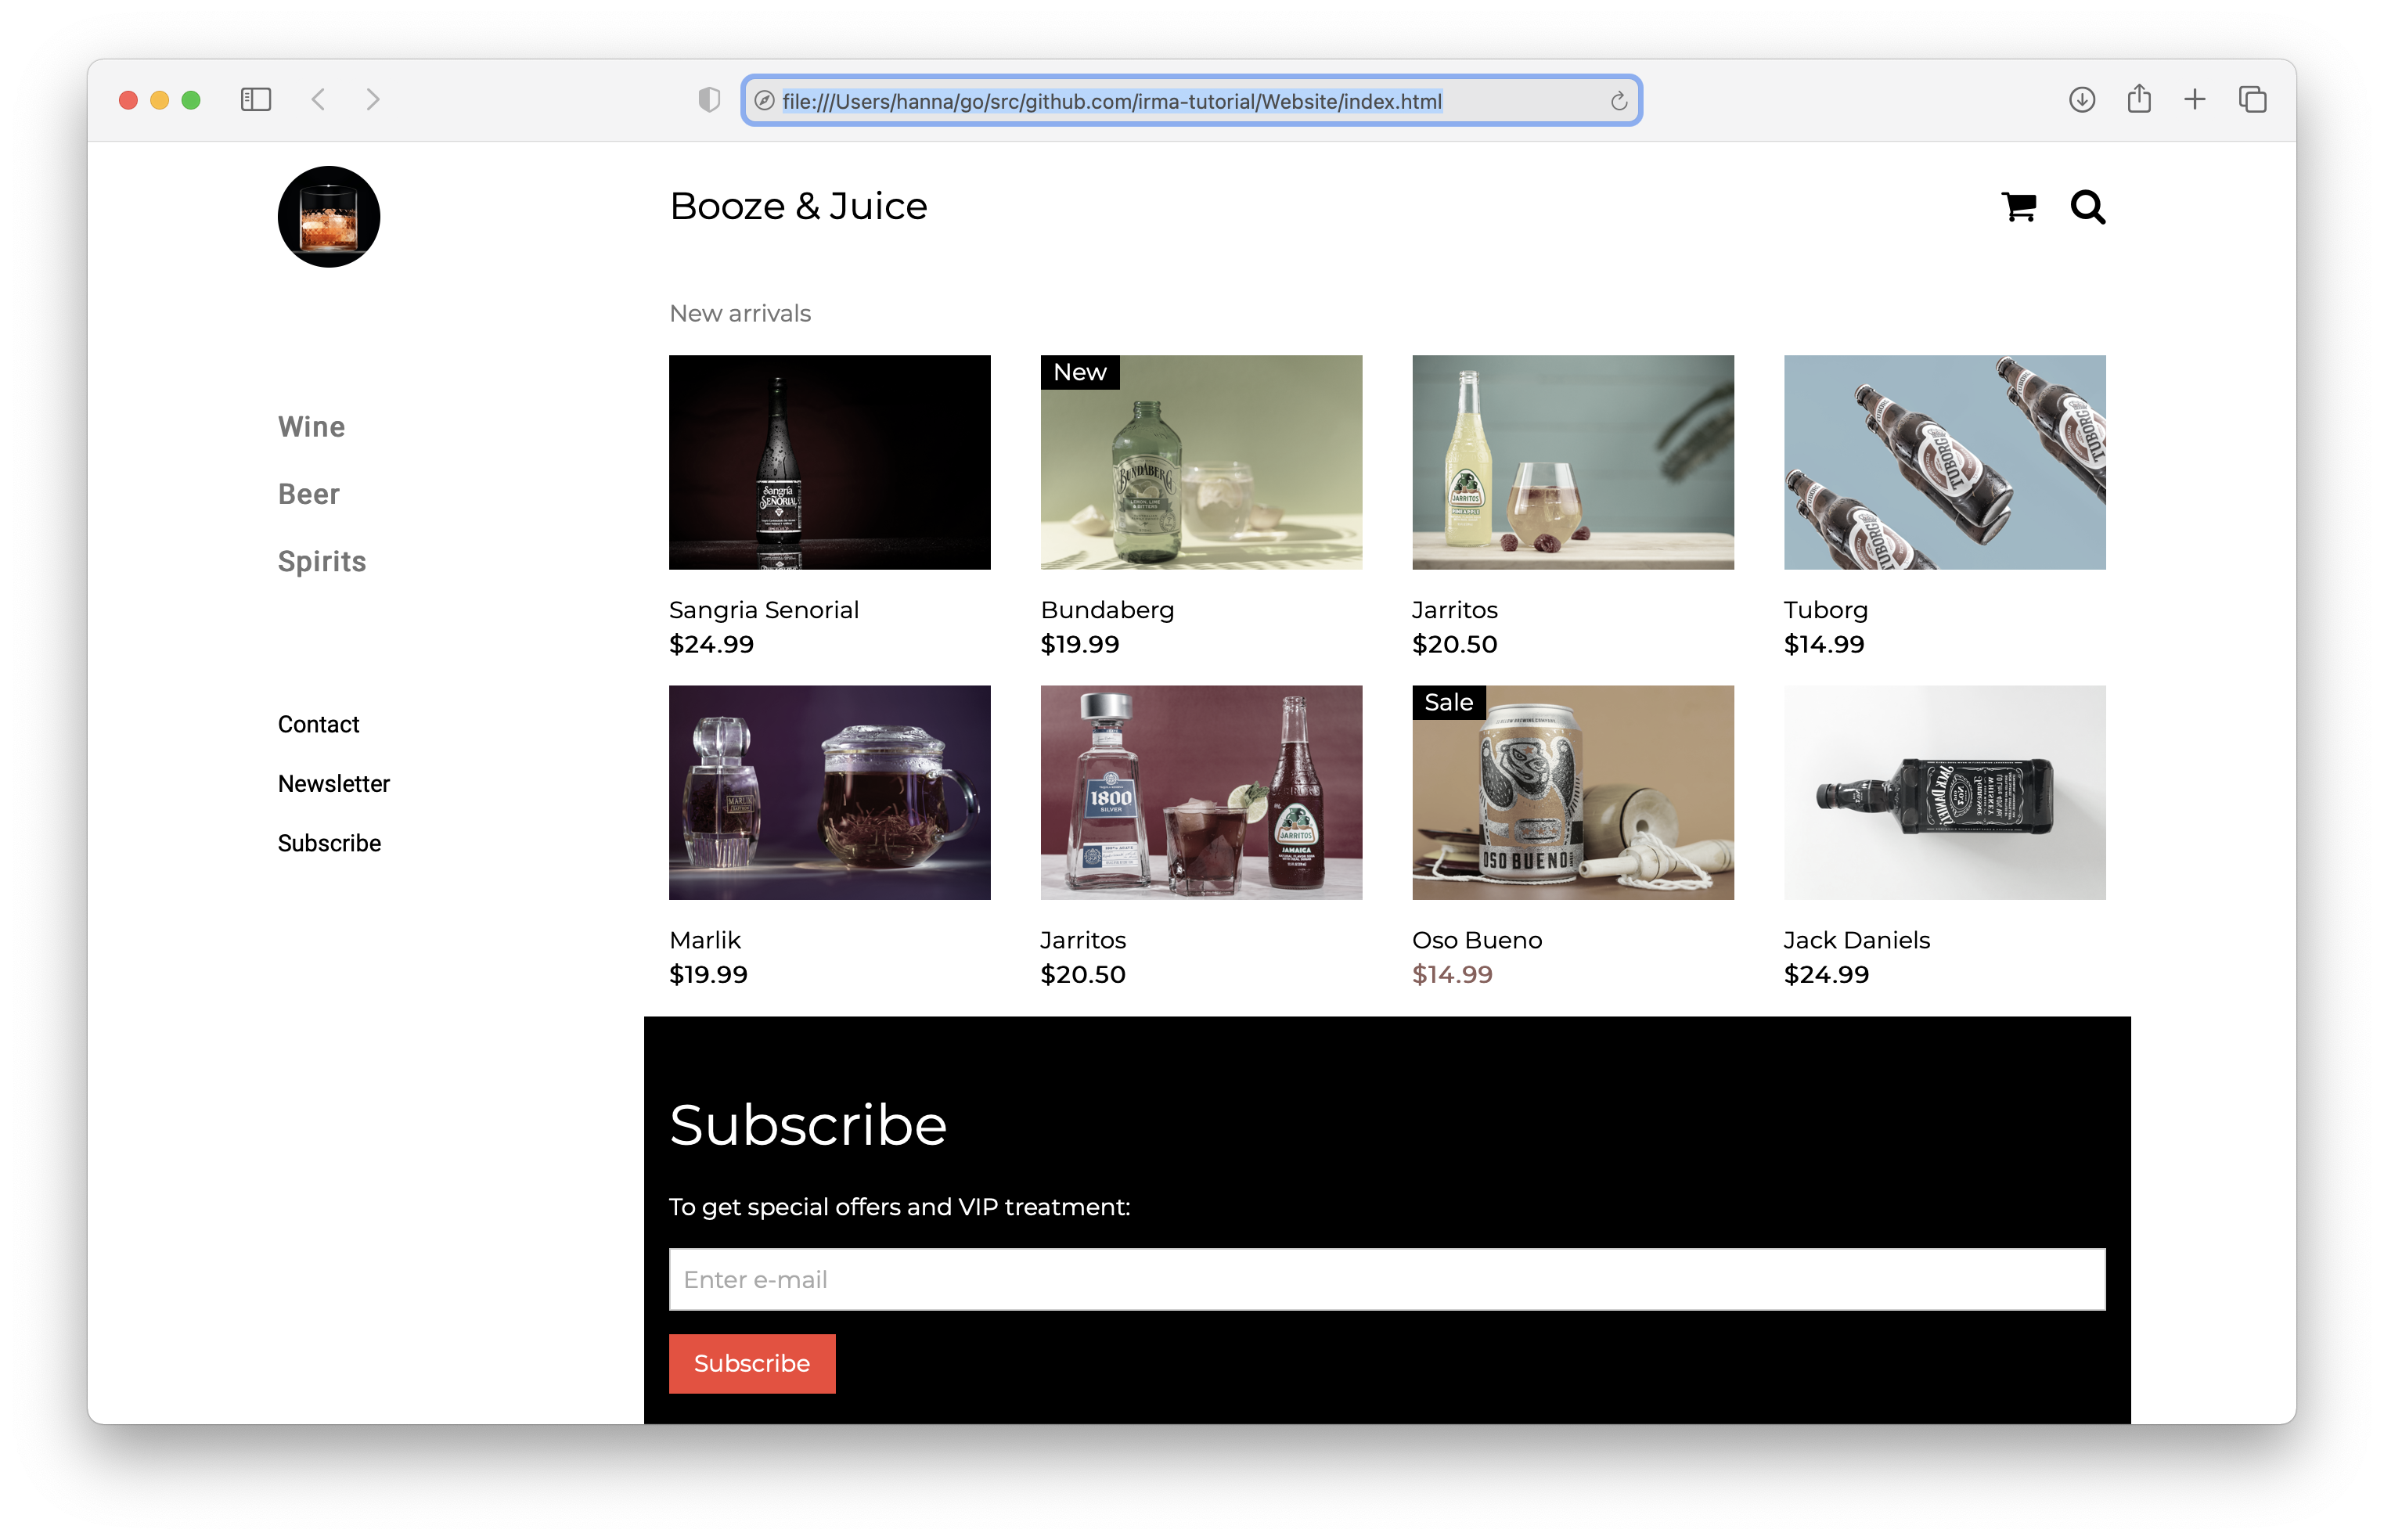
The IRMA made easy project is meant to make IRMA easy for everyone. So far, the project has focused primarily on end users. This tutorial is a bit different. It aims at making it easier for developers to use and integrate IRMA in their projects, by guiding them step-by-step through a typical IRMA use-case. Specifically, the tutorial gives an overview of how to control access to a static website with attribute-based authentication via IRMA. To provide a realistic and concrete example, this tutorial assumes the developer wants to control visitors’ access to an alcohol web shop (see screenshot below). In the Netherlands, to visit such web shops, users have to be 18 years or older. The tutorial will show how one can use the IRMA platform to ensure everyone visiting the website is of legal drinking age in a privacy-friendly and manner. Of course, the steps described can easily be adapted to facilitate other use cases as well.
A reference repository with an example website together with all the files created during this tutorial is available at on GitHub.
Prerequisites
This tutorial is meant to show how to integrate IRMA into an existing website setup. It does not go into detail onto all the other issues that come with hosting a website with an authentication flow. In particular, before deploying a solution like this to production, you should already be aware of:
- How sessions and session cookies work, and what safety concerns come with the implementation you use for them.
- How to configure your web server for production, including topics like caching and such.
- Security best practices in general
Furthermore, for the examples presented here, we assume at least a basic understanding of
- Node/npm and the express.js server framework.
- Client side javascript.
- NGINX.
Finally, in order to test your work, you need to ensure that the instance of NGINX you use for this tutorial can be reached by your telephone. For the rest of this tutorial, we will be assuming that it is reachable on 192.168.1.108:8080, but if you have a different IP or use a different port, you will need to change this.
Starting situation and plan
We assume that on the NGINX server, there is a static website already server. In particular, we expect there to be a location block for this static website, of the form
location / {
    root /path/to/static/site/root/
    index  index.html index.htm;
}
When going to your server, you should at this point see the page you want to put behind the age check.
In the next steps, we are going to do the following to put the age gateway into place:
- Add an IRMA server to our setup.
- Add a node service to verify access and start the IRMA age check.
- Add an actual gateway page and enable authentication using NGINX http_auth_request_module.
Setting up our IRMA server
First, we need to download the latest version of the IRMA server. You can get pre-built binaries for your platform from our github repository, or download and build from source. We assume you renamed the binary to irma instead of irma-master-platform-cpu and that the binary is on your command line path somewhere.1 To test you successfully got a version of IRMA, run
irma version
which should give output similar to
IRMA toolkit v0.6.0
Documentation: https://irma.app/docs

Version:  0.6.0
OS/Arg:   darwin/amd64
Configuration of IRMA server
We could now start the IRMA server simply by executing
irma server
This starts an IRMA server on your machine using the default configuration. However, as we are going to reverse proxy the server, and also want add authentication for the access control server, we need to make our own configuration.
This can be done in two ways:
- Adding the configuration options we want to change as arguments on the command line
- Creating a configuration file, and loading it with the
-c <configuration file>command line argument. In this tutorial, we will use the second one, as that makes it easier to follow what changes we are making.
First, since we want to reverse proxy our IRMA server, we will need to tell it what the public URL is it can be reached on. To do this, let us create a file config.json containing
{
   "url": "http://192.168.1.108:8080",
}
The IRMA server configuration file should be a simple json dictionary, with values for each option we wish to change from the default. Here, we just told the IRMA server that it should expect itself to be reachable from 192.168.1.108 for external requests.
Next, since we use NGINX as a reverse proxy, so long as we trust the network between NGINX and the IRMA server, we won’t need to encrypt traffic between those. To stop the server from warning us that TLS is disabled, let us tell it explicitly that we won’t be using it:
{
   "url": "http://192.168.1.108:8080",
   "no_tls": true
}
Finally, by default the IRMA server does not authenticate request to start sessions. This means that anybody who can reach our server can use it to run sessions. To disable this, we will enable requestor authentication, and disable the option to do unauthenticated requests:
{
   "url": "http://192.168.1.108:8080",
   "no_tls": true,
   "no_auth": false,
   "requestors": {
       "AccessController": {
           "auth_method": "token",
           "key": "token_value"
       }
   }
}
The no_auth setting disables unauthenticated requests. On the next line, we define a set of requestors under the requestor parameter. Each requestor needs a name (AccessController in our case), and a method and key for authentication. Here we use token authentication (the "auth_method": "token" line), specifying token_value as the token to be used during authentication. For a full overview of requestor authentication methods, see the requestor authentication documentation.
Enabling authentication is not strictly necessary if we keep the session management endpoints unreachable from the outside world. However, enabling it here protects us should we accidentally expose those endpoints.
Having completed the configuration, we can now start the IRMA server using
irma server -c config.json
In your environment, you might want to change more options given by IRMA. For production use in particular, the production flag is needed. For a full overview of all configuration options, see the IRMA server documentation.
Setting up the NGINX reverse proxy
Next, we need to ensure that our phone can actually reach this IRMA server through the NGINX server. All endpoints the phone and frontend will need are under /irma, so it is enough to just forward those URLs. By default, the IRMA server listens on port 8088, so we insert the following in the NGINX configuration above the location entry for /
location /irma {
    proxy_pass http://localhost:8088/irma;
}
We can now test our IRMA server setup by running in the command line:
irma session --server http://localhost:8080 --auth-method token --key token_value --disclose pbdf.gemeente.personalData.over18
This instructs the IRMA tool to start a session for disclosing the pbdf.gemeente.personalData.over18 attribute using our IRMA server, authenticating using our token. If the server is setup correctly, you should see a QR appear, and, after scanning it with your phone’s IRMA app, you should be able to complete the session.
Authentication service
Next, we need to setup an authentication service. We will be using NGINX’s http_auth_request_module, which needs an endpoint that returns status code 2xx for authorized users, and returns 403 for unauthorized users. Furthermore, our gateway page will need some way to start an IRMA session, so we need a second endpoint to do that. Combining these requirements, we will make a small node/express.js server that has the following endpoints
- /: Checking the users session cookie, fetching IRMA session results if needed, and return 200 if the user has access, and 403 otherwise
- /startAuth: Starts an IRMA session and gives the user a cookie pointing to that sessions results once they become available.
Setting up the project
First, we need to make a directory for the project and move into it. Assuming that is done, let us setup the project with npm, and add our main dependencies
npm init
npm install --save express express-session @privacybydesign/irma-backend
During npm init, the default entry point indes.js is fine. We will use express.js and the express-session package for our server, and to manage sessions. Irma-backend provides us with a javascript interface for talking to IRMA server.
Next, we setup index.js with the following scaffolding, creating the two endpoints:
const express = require('express');
const session = require('express-session');
const IrmaBackend = require('@privacybydesign/irma-backend');

// Express.js setup
const app = express();
const port = 3000;

// NOTE: The settings here are not suitable for production. Ensure you are
// aware of how your session storage solution works and how to configure it for
// your production needs
app.use(session({
    secret: 'cookie-secret',
}));

app.get('/', (req, res) => {
    res.sendStatus(201).end();
});

app.get('/startAuth', (req, res) => {
    res.sendStatus(201).end();
});

app.listen(port, () => {
    console.log(`Listening at localhost:${port}`);
});
This code loads all our dependencies, and sets express.js up to provide a server listening on port 3000, whilst keeping track of sessions. We won’t go into details here, as most of this is basic usage of express.js and express-session, and we refer to the express documentation if you want to read up on this.
Starting IRMA sessions
The first thing we’ll implement is the starting of IRMA sessions. To do this, we need to take the following steps:
- Configure irma-backend to communicate with our server.
- Decide what information we want to request.
- Tell the IRMA server to make a session based on our request.
- Return the session pointer to the frontend
Let us start by configuring irma-backend. For this, we add the following right after the express.js setup:
// Irma server setup
const irmaServer = new IrmaBackend('http://localhost:8088', {
    serverToken: 'token_value',
});
This creates an IRMA backend instance configured to our server. The first argument is the internal URL of the IRMA server we want to use. The serverToken option specifies the token value to use to authenticate to this IRMA server.
Before writing the code to start a session, let us first consider what we want to ask specifically. We want to know whether the user is older than 18, which, using according to the attribute index can be found out by the user having a yes value for one of the following credentials:
- pbdf.gemeente.personalData.over18
- pbdf.pbdf.ageLimits.over18
- pbdf.pbdf.idin.over18 There are several others, but they are for pilots and not of interest to us. To figure out which value exactly for each represents yes, we can get these credentials and do disclosures using IRMA session to ourselves. Using that information we can fill in our session request, getting
{
    "@context": "https://irma.app/ld/request/disclosure/v2",
    "disclose": [
        [
            [{type: "pbdf.gemeente.personalData.over18", value: "Yes"}],
            [{type: "pbdf.pbdf.idin.over18", value: "yes"}],
            [{type: "pbdf.pbdf.ageLimits.over18", value: "yes"}],
        ]
    ],
}
This follows the format for a disclosure (first two lines), asking for the user to have at least one of the age attributes with value yes. A full description of the disclosure request format, as well as format for other request types, can be found in the session request documentation.
Using this session request, we can now use our IRMA backend setup to start a session:
app.get('/startAuth', (req, res) => {
    console.log("starting session");
    // Start an irma session for the user
    irmaServer.startSession({
        "@context": "https://irma.app/ld/request/disclosure/v2",
        "disclose": [
            [
                [{type: "pbdf.gemeente.personalData.over18", value: "Yes"}],
                [{type: "pbdf.pbdf.idin.over18", value: "yes"}],
                [{type: "pbdf.pbdf.ageLimits.over18", value: "yes"}],
            ]
        ],
    })
    .then((//TODO)
    .catch((e) => {
        // An error occured.
        console.log(`Error ${e} when starting session`);
        res.sendStatus(500).end();
    });
});
The startSession function takes our session request object as argument, and returns a promise resolving to a session pointer and a session token. The session pointer is what the fronted libraries will need to render a QR that the app can scan. The session token is a token which the backend can use to request the session results after it is completed.
Let us process these, storing the token in the users session for later use, and sending the session pointer to the frontend.
app.get('/startAuth', (req, res) => {
    console.log("starting session");
    // Start an irma session for the user
    irmaServer.startSession({
        "@context": "https://irma.app/ld/request/disclosure/v2",
        "disclose": [
            [
                [{type: "pbdf.gemeente.personalData.over18", value: "Yes"}],
                [{type: "pbdf.pbdf.idin.over18", value: "yes"}],
                [{type: "pbdf.pbdf.ageLimits.over18", value: "yes"}],
            ]
        ],
    })
    .then(({sessionPtr, token})=>{
        // Send session pointer to frontend, and store token for later
        req.session.irmaSessionToken = token
        res.send(sessionPtr).end();
    })
    .catch((e) => {
        // An error occured.
        console.log(`Error ${e} when starting session`);
        res.sendStatus(500).end();
    });
});
The code for starting an IRMA session is now complete. If you start the server using node index.js and navigate in your browser to localhost:3000/startAuth, you will see something like
{"u":"http://192.168.1.108:8080/irma/session/Ufo0CsK2y8NT99jfk0YG","irmaqr":"disclosing"}
If instead you get an error, check that your IRMA server from the previous part is still running, and that you provided its internal address, and not the address of your NGINX server.
Verifying the users access
The next step is to complete the verifying of a users access. There are three cases:
- First, we previously verified access, so they are still allowed in
- The user started an IRMA session, but we haven’t seen results yet, so we need to actually check results
- The user never even started an IRMA session, so no access yet. This results in the following outline for our code:
app.get('/', (req, res) => {
    console.log("verifying authentication with: ", req.session);
    if (req.session.isVerified) {
        // User has previously been checked, streamline the process now
        res.sendStatus(201).end();
    } else if (req.session.irmaSessionToken) {
        // User has not yet completed the check, but has started a session
        // here we check whether that session was successfull.

        // TODO
    } else {
        // User hasn't even started an irma session yet, so they definitely won't have access.
        res.sendStatus(403).end();
    }
});
We can fetch results using the getSessionResult function, by passing it the session token of the session we want results for. It returns a promise resolving to a sessionResult object. For now, we only want to know whether the user completed the session (status == "DONE"), and whether the proofs they provided were valid (proofStatus == "VALID"). Given the session request above, if both of those is true, the user must have an over18 attribute with value yes. This results in the following code:
app.get('/', (req, res) => {
    console.log("verifying authentication with: ", req.session);
    if (req.session.isVerified) {
        // User has previously been checked, streamline the process now
        res.sendStatus(201).end();
    } else if (req.session.irmaSessionToken) {
        // User has not yet completed the check, but has started a session
        // here we check whether that session was successfull.
        irmaServer.getSessionResult(req.session.irmaSessionToken)
        .then((result) => {
            if (result.status == "DONE" && result.proofStatus == "VALID") {
                req.session.isVerified = true;
                res.sendStatus(201).end();
            } else {
                console.log('user did not successfully complete irma session');
                res.sendStatus(403).end();
            }
        })
        .catch((e) => {
            // On error, log that error, then deny access as that is the safest thing to do
            console.log(e);
            console.log('something failed with the  irma session, denying access.');
            res.sendStatus(403).end();
        });
    } else {
        // User hasn't even started an irma session yet, so they definitely won't have access.
        res.sendStatus(403).end();
    }
});
Here, we simply deny access on errors or incomplete sessions. Depending on your flow, you might to want to make more fine-grained decisions based on the status, proofStatus and other parts of the session result object.
This completes the access control service. We can start it with node index.js, and it will listen and serve requests on port 3000. With some creativity, we could test it now, but it will be easier to do that during the next section.
Integrating the control service
Now, let us integrate the access controller into NGINX, and use it to control access to our website. This involves two main steps:
- Using the control service to check whether a user is allowed to access the main web page.
- Adding a gateway page where users are send when they still have to prove their age.
Adding the authorization check
First, we need to tell NGINX about the authentication verification endpoint:
location = /verify-auth {
    internal;
    proxy_pass http://localhost:3000/;
}
This creates an internal location that we can specify to NGINX in other directives as a destination, pointing to the / endpoint of our access control server.
Using this, we can restrict access to our webserver’s / by changing it’s location entry to:
location / {
    root   /usr/local/var/www;
    index  index.html index.htm;
    auth_request /verify-auth;
}
The auth_request directive tells NGINX to use the status code of /verify-auth (which points to our access control server) to determine whether to permit the request to go through.
The above restricted access to all parts of our website. We might have several assets such as javascript files and images that we might want to share between the restricted and non-restricted parts of our sites, or want to more aggressively cache. To do this, we need to exclude these from the authentication by adding separate location blocks for them above the / location block:
location /assets {
    root   /usr/local/var/www;
}

location /images {
    root   /usr/local/var/www;
}
For the example, we just exclude the /assets and /images folders from caching, as we will need these for our age gateway.
Creating the age gateway page
We now have blocked of our site, but we still need to add a page for the user to show their age. We won’t go into the HTML part of creating the page, but instead assume that we already have a (non-functional) page with a button for the user to click on to start showing their age.
First, we need to add the IRMA frontend library to this page. We can download its javascript from our gitlab. We include it in the page by simply adding a script tag referring to it:
<script type="text/javascript" src="assets/irma.js"></script>
Next, we add a script to bind to the start buttons onclick event. On this event, we want to start an IRMA session and show it. This can be done by the IRMA frontend package by configuring it correctly. Let us start by providing it with its options:
let options = {
    // Front-end language
    language: 'en',

    // Back-end options
    session: {
        // Point this to your server:
        url: 'http://192.168.1.108:8080',

        // Define your disclosure request:
        start: {
            method: 'GET',
            url: o => `${o.url}/startAuth`,
        },

        // Define how request results should be mapped to a session pointer to display
        mapping: {
            // The only thing included in the request is the session pointer, so disable additional parsing.
            sessionPtr: r => r,
        },

        // Results are handled on backend, so not needed here
        result: false,
    }
};
Let us go over this in parts. The top section defines the language used by the fronted, in our case English.
Next, we define what our sessions should look like in the session object. The URL tells irma-frontend where it can find the IRMA server. Next, we describe what request can be used to start a session. In our case, this is a GET request to /startAuth. This request URI is derived from the main server URL by providing a lambda that takes the session configuration object as its argument. By default, the frontend library expects to get an object with both the session pointer and the session token. Since we stripped of the session token in the backend and have no need for it here in the frontend, we need to define how to extract the session pointer from the request results. Since we pass just the session pointer, this is just the identity function.
Finally, as we don’t give IRMA frontend the session pointer, we need to tell it that it doesn’t need to fetch the full session results. We don’t have any use for that here anyway, as all the checking is done in the backend anyway.
Now we can bind to onload to add an onclick handler to our button on startup:
window.onload = function() {
    document.getElementById('start-popup').onclick = () => {
    const irmaPopup = irma.newPopup(options);
    irmaPopup.start()
        .then(result => {
        // Reload page now we are authenticated
        location.reload();
        })
        .catch(error => {
        if (error === 'Aborted') {
            // Abort just signals that the user made a choice to abort
            // so don't log it as an error
            return;
        }
        console.error("Failure during irma session: ", error);
        });
    };
}
In the handler, we first create a new popup driven frontend for our session, then start it, and finally deal with the result. On success, the session has completed, and (as we will see from the NGINX configuration) we can go to the intended page simply by reloading. On errors, if they are not simply an abort, we log them. In production, you might want to give some indication to your user that something went wrong.
Adding the gateway page to NGINX
Next, we need to integrate the page into our NGINX configuration. For it to function, we first need to provide the /startAuth endpoint it depends on. Adding the following above the / location block does this:
location = /startAuth {
    proxy_pass http://localhost:3000/startAuth;
}
Then, we want to show the user our gateway page when they are not authenticated yet:
error_page 403 =200 /age-gateway.html;
location = /age-gateway.html {
    internal;
    root /usr/local/var/www;
}
These lines create an internal route for our age-gateway page, and tells NGINX to display its content every time it would otherwise have given a 403 error. We do this, instead of a redirect on 403 to get the browser to keep track of our original destination, allowing a simple reload on authentication.
Conclusion
This completes the configuration. Reloading NGINX with it and navigating to your server, you should now first be greeted with the gateway. Upon completing the IRMA session, the page will refresh and you should see the actual site that is guarded by the gateway (see screenshot).
-
After publishing this blog post, we received a good tip about this part: Instead of renaming the binary, which could lead to human errors, a symlink can be used. When a new version is built, the symlink will point to the latest version. If you rename, the new version will be
irma-master-platform-cpu, but the old will still be calledirma. So users could call that and get the outdated version without knowing. ↩︎